
In this tutorial you will learn how to create gold, silver, and copper material. Key terms include reflection, specular, index of refraction, fresnel, and fall-off. This tutorial is aimed at both beginners and professionals. Although this tutorial is based on 3D Studio Max, the same settings apply to many other 3D products.
If you don’t feel like going thru all the steps in this tutorial, you can download a matlib (.mat) file for 3D Studio Max thru a link at the bottom of this tutorial.
Note: Click on the thumbnail in each step for a larger screenshot that includes the viewports and the relevant portion of the user interface.
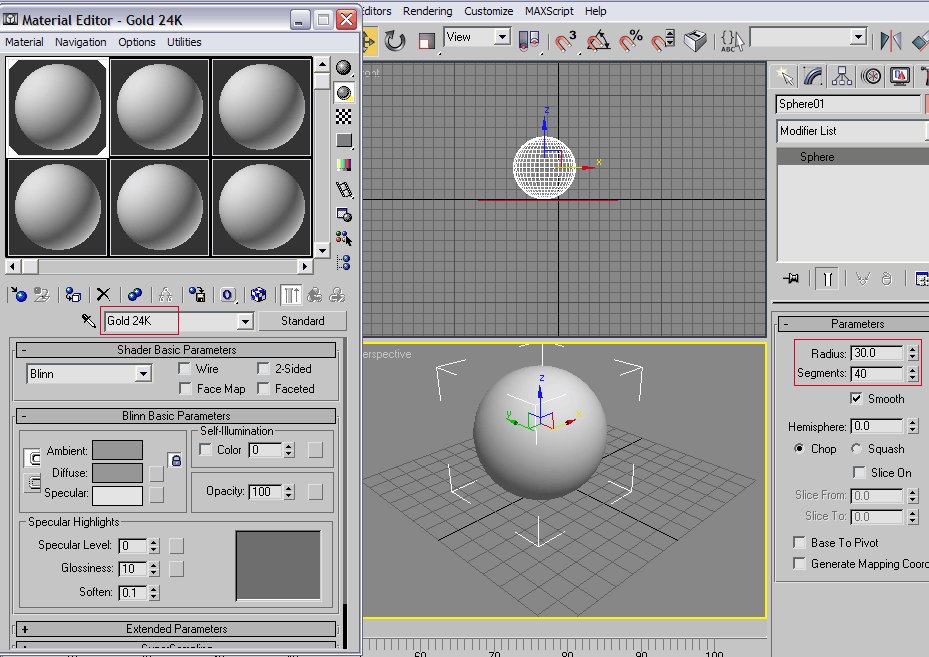
Step 1 Create a new sphere and place it in the center of the Perspective viewport with Radius 30 and Segments 40 On the Left viewport, move up the sphere as shown in the screenshot.Open the Material Editor (select from Rendering menu or press M key) and assign the first material to the sphere and rename the material to Gold 24k.
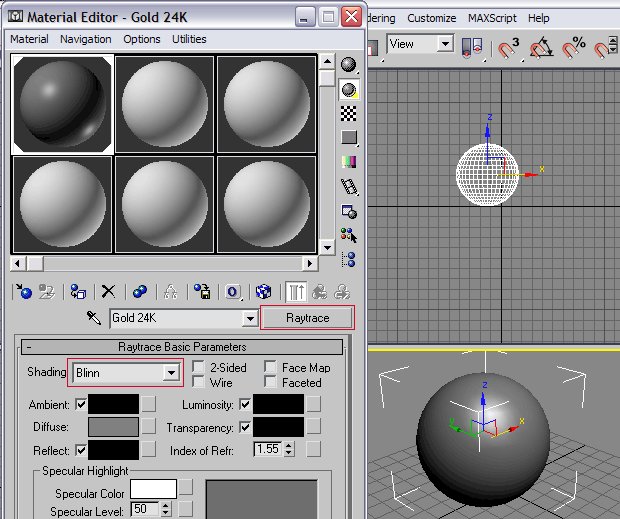
Step 2 In the Material Editor click the Standard button (next to the name Gold 24K) and select Raytrace from the list. Change the Shading type to Blinn.
Step 3 Set the Diffuse color to RGB 70,40,0.
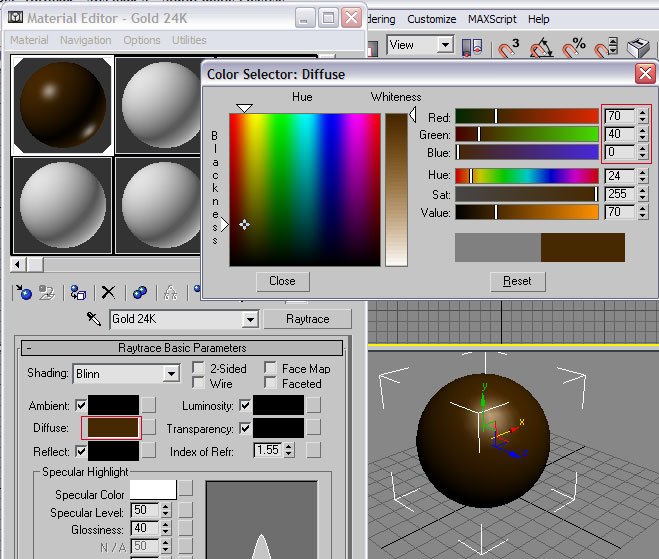
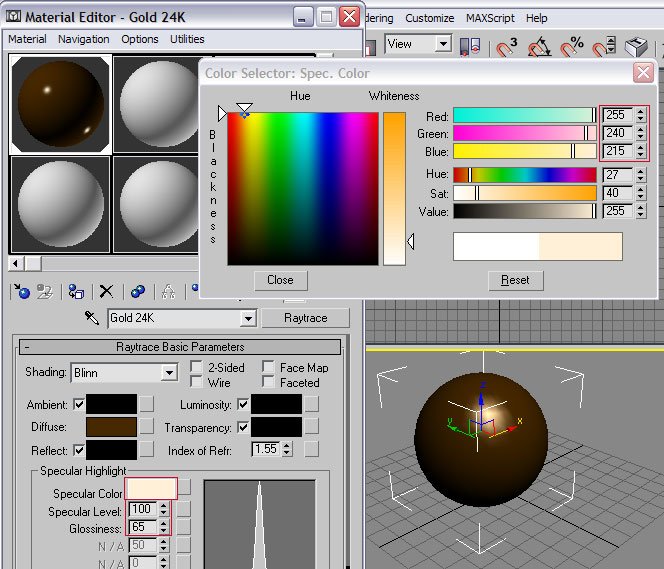
Step 4 Set the Specular color to RGB 255,240,215. Set the Specular Level to 100 (for now) and Glossiness to 65.In a completed scene with lighting and other objects in the environment you probably want to set the Specular Level to 0 and have an object that emits light create the specular reflections in the gold object.
Step 5 Click on the empty square button next to the Reflection color, select Falloff from the list and click OK.
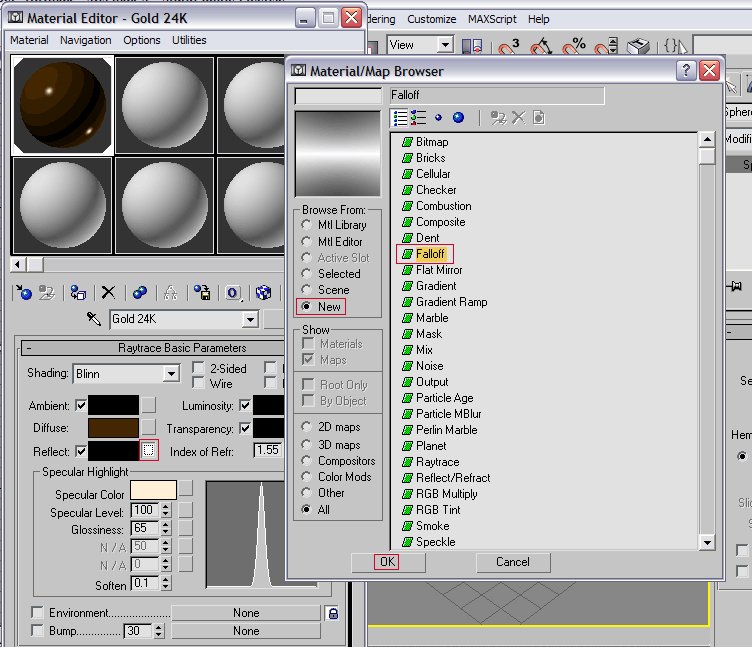
Step 6 Set the second color (click the white box) to RGB 255,200,100.Set the Falloff Type to Fresnel, and set the Index of Refraction value to 15.

Step 7 Press the Background button to display the colored checkerboard and get a better idea of how it will look in a scene.

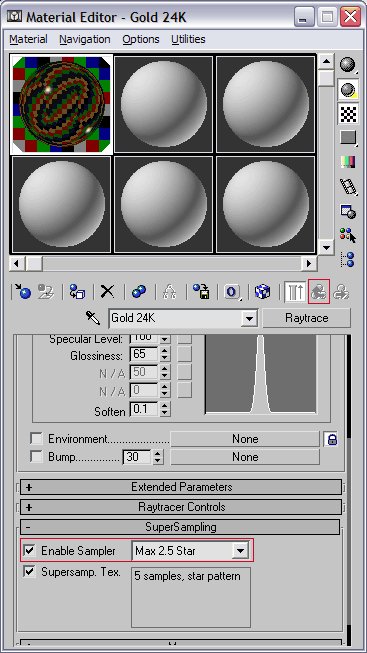
Step 8 Now click the Go to Parent button and scroll down to the SuperSampling section of the material.Enable the Enable Sampler option and choose Max 2.5 Star or if you have a fast computer choose Hammersley.
Step 9 Next, let’s makes some changes to the environment as the gold won’t look good in just a black environment. It needs something like another object to reflect.Select Environment from the Rendering menu and set the Background Color to white. Close the Environment dialog box.

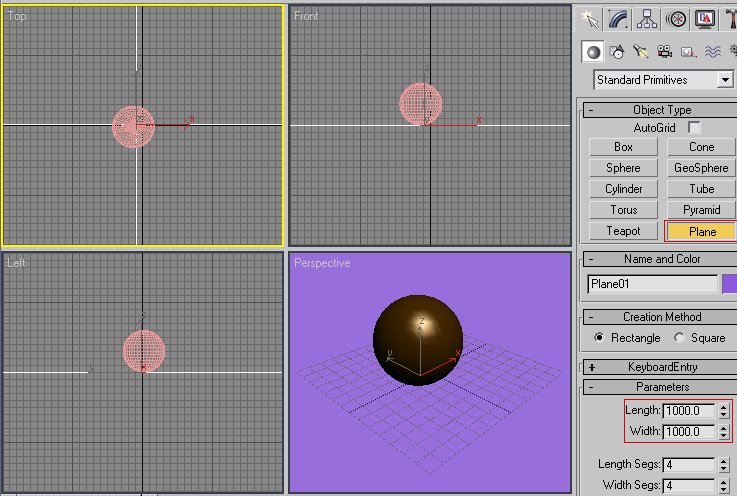
Step 10 Add a ground Plane on the Top viewport with Length: 1000 and Width: 1000.
Step 11 Open the Material Editor again and select the material below Gold 24K and rename it from 7 – Default to GroundPlane.Click the small empty quare button next to the Diffuse color, select Checker from the list, and click OK.

Step 12 Set the Tiling to 9 for both the U and the V. Set the W Angle to 45.
Assign the material to the plane object you jsut created (Plane01). You can do this by dragging the material to Plane01 in a viewport, or by clicking the Assign Material to Selection button in the Material Editor. Click the Show Map in Viewport button to display the material in the viewport.

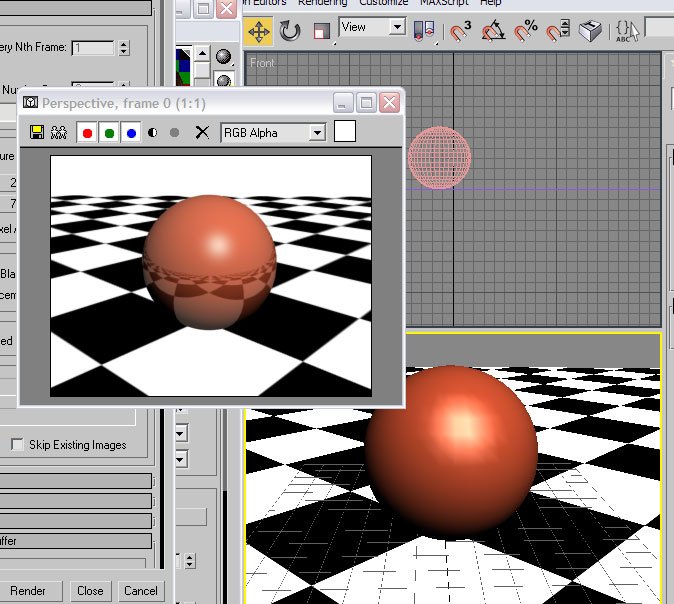
Step 13 Rotate the Perspective viewport and zoom in on the ball as shown in the screen shot. Press F9 or F10 to render the Perspective viewport and check out the results.
We used the default lighting setup in this render, but if you do add lights yourself, and you want to make it more realistic, lower down the Refrection value to a minimum of 40 (on the Maps rollout section of the Gold 24K material in the Material Editor).
 Step 14
Silver looks similar to gold, so we can change the Gold 24K material to a silver material quite easily.Open the Material Editor and drag and copy the Gold 24K material to the material next to it and change its name to Silver.
Change the Diffuse color to RGB 197,198,200.
 Step 15
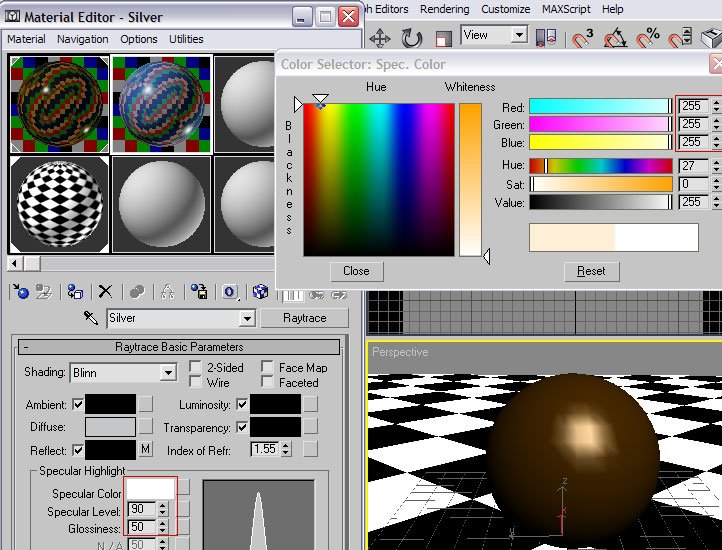
Set the Specular color to white (RGB 255,255,255).
Set the Specular Level to 90 and the Glossiness to 50.
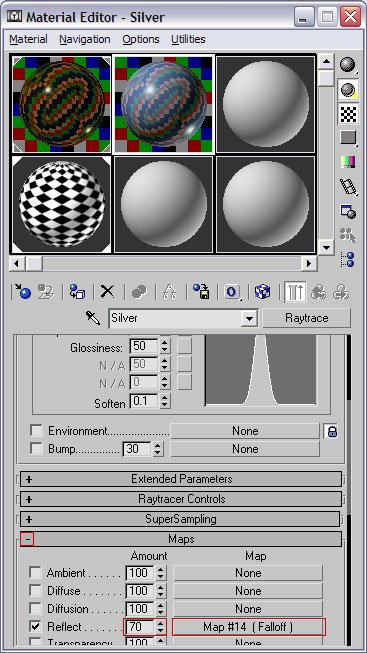
 Step 16
Scroll down in the Material Editor and open the Maps section. Change the Reflect level to 70 and click the Map #X (Falloff) button.
 Step 17
Change the second color of the Falloff map to RGB 228,229,231 and change the Index of Refraction value to 10.
Assign the material to the sphere object by dragging the material to Sphere01 in a viewport, or by selecting the Sphere and clicking the Assign Material to Selection button in the Material Editor.
 Step 18
Press F9 or F10 to render the Perspective viewport and check out the results.
 Step 19
Now for the last metal in this tutorial: copper. Copper is kinda brown/orange and is less reflective than gold and copper.Open the Material Editor and copy the Silver material to the material next to it, and rename it to Copper.
Change the Diffuse color to RGB 225,87,51.
 Step 20
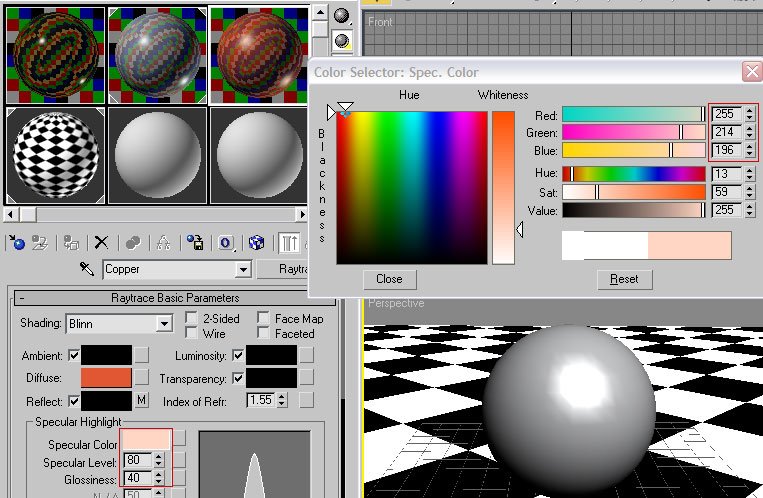
Set the Specular color to white (RGB 255,214,196).Set the Specular Level to 80 and the Glossiness to 40.
 Step 21
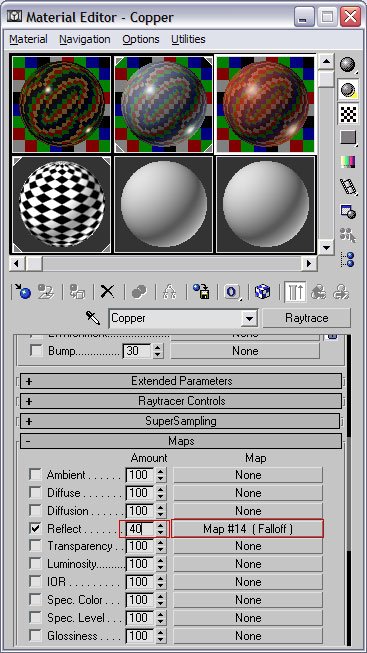
Scroll down in the Material Editor and open the Maps section. Change the Reflect level to 40 and click the Map #X (Falloff) button.
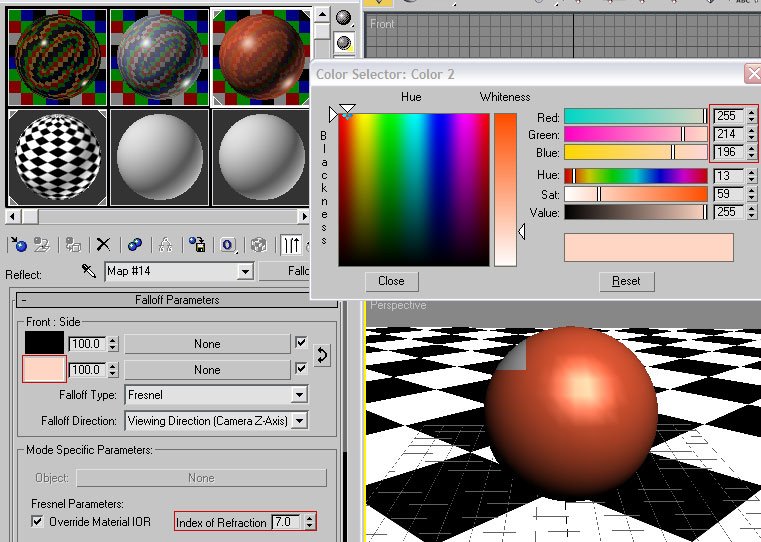
Step 22 Change the second color of the Falloff map to RGB RGB 255,214,196 and change the Index of Refraction value to 7.
Assign the material to the sphere object by dragging the material to Sphere01 in a viewport, or by selecting the Sphere and clicking the Assign Material to Selection button in the Material Editor.
Step 23 Press F9 or F10 to render the Perspective viewport and check out the results.
As I mentioned in the introduction, the materials may need a little tweaking to fit your purpose. Try playing around with the reflection values for example. And if you want to make it more realistic, add a scratch map.
This concludes this tutorial. I hope you enjoyed this tutorial and that it contributed something to your skills and knowledge.
Here you can download a matlib file with the gold, silver, and copper material from this tutorial.